Showing posts with label ink cartridges. Show all posts

Wednesday, 1 June 2016

Change cartridges HP Deskjet 1000 series

Printer Blog >> Help >> Change cartridges HP Deskjet 1000 series

HP Deskjet 1000 series


Change printer cartridges HP Deskjet 1000, Deskjet 1010, Deskjet 1050, Deskjet 1510, Deskjet 1512, Deskjet 1515.

To change printer cartridges HP Deskjet 1000 series you can follow the instructions in the manual that includes or perform the following steps:


Hp Deskjet 1050

Steps to change the ink cartridges


  • Verify that the printer is connected and that paper. In order to change the printer cartridge correctly must be like if you were to print.
  • Open the cartridge door is at the front. You will see that the car with the cartridges will begin to move to move to the center. Expected to stay standing in the center to remove the cartridges.
  • Press down the cartridge gently until you feel disengages. Sometimes it takes a bit but can usually be easily removed, I remove it from its slot.
  • Open the new cartridge and carefully remove the protective tape. This usually takes a striking and directions on how to remove color. It serves to protect the head cartridge because in these models is integrated. Try not touch the head or contacts, as dirt can cause the cartridge to malfunction.
  • Insert the new cartridge until you hear a click. Make sure you're getting in the right place. If you're trying to get the cartridge and see that you do not fit, try to get him into the next slot because it can not be that your site :-).
  • Close the cartridge door and wait for the printer to perform their "homework".


Once installed a new cartridge, it is best to take out a print test to verify that it works correctly.

More accurate impression you would like shown below:

Print test HP Deskjet 1000


If you have left you with some color spots or it does not work, then you have to perform head cleaning with printer software or manually.

Remember these steps to clean the heads dela HP printer used for the following models:
HP Deskjet 1000, Deskjet 1010, Deskjet 1050, Deskjet 1510, Deskjet 1512, Deskjet 1515.


How to install the ink cartridges in the Epson Stylus Pro 7880/9880


Printer Blog >> Help >> How to install the ink cartridges in the Epson Stylus Pro 7880/9880

How to install the ink cartridges in the Epson Stylus Pro 7880/9880


Steps to install the ink cartridges


Epson Stylus Pro 7880/9880Today we'll try to help install the ink cartridges in the Epson Stylus Pro 7880 printer and plotter 9880. These are for professional use and are very well received by those who are engaged in the printing of posters, brochures, etc. Epson offers very good picture quality in almost all printers thanks to the technology used in their cartridges and ink type.

If you are printing large jobs it is better check before the ink levels because you can stay with the job half done, unless you have a replacement cartridge.


When i have to change the ink cartridge?

Thanks to the LCD screen of these plotters can see the 8 slots corresponding to each of the ink cartridges indicating percentage of remaining ink. When the red ink (teardrop) is flashing and the message that "low on ink" is when you have to start preparing a replacement cartridge appears on the screen.
When the red light is on permanently on the screen the message you replace the cartridge so it is displayed when you have to replace it


How to change the ink cartridge


  • The first thing you have to do is give the power button.
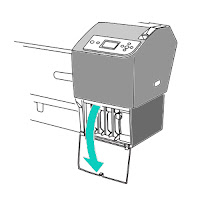
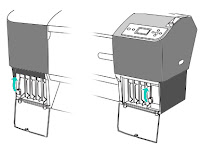
  • Then you must open the cover of the ink cartridges down and up the levers up to unlock the cartridges.


Epson Stylus Pro 7880/9880 change cartridgesEpson Stylus Pro 7880/9880 change cartridges

Source: https://files.support.epson.com/pdf/pro7880/pro7880gd6.pdf

  • Remove the ink cartridge in the printer that are about to change.
  • Take out the new ink cartridge from its packaging and shake.
  • Epson Stylus Pro 7880/9880 change cartridges
  • Source: https://files.support.epson.com/pdf/pro7880/pro7880gd6.pdf
  • Insert the ink cartridge and verify that the printer has detected across the LCD.
  • After installing the ink cartridge, lower the ink lever. The printer starts charging the ink delivery system and the power indicator is flashing.

That is all! We have prepared our plotter to print our wonderful work!


Original post: Cómo instalar los cartuchos de tinta en la Epson Stylus Pro 7880/9880

Tuesday, 10 May 2016

Ink systems print

Printer Blog >> FAQ >> Ink systems print

Ink printing systems


Types of printing systems that can use inkjet printers.


There are many types of printing but there are two systems that are most common on the market:


Ink printing systems


Thermal printing system or Bubble Jet.

Some brands such as HP, Canon, Xerox Lexmar or use this system for printing. Basically it consists of applying heat to the ink within the cartridge by electric current through resistors.

The heat causes the ink to rise to temperatures up to 500 ° C which generates a bubble enlarges. This bubble pushes the ink to the outside through microducts having a cartridge to the cartridge head.

That is why this type of printers catch high temperatures and should be protected and a bit humid place.

Cartridges normally used in this system are more expensive but printers have less maintenance because the heads are replaced with the cartridge.

Piezo-electric system.


This system, instead of carrying resistors, takes a piezoelectric material which generates a movement when applied electrical charge. It is the system used by Epson printers.

Like the Bubble Jet system, this makes a pressure by the movement of piezo-electric crystal ejecting ink out through the conduits of the cartridge. With this technology, you can use special pigment inks resistant to moisture and the quality of prints is greater. That is why Epson printers have a good photo quality.

Check out the source at Tipos de impresión con cartuchos