Showing posts with label printer maintenance. Show all posts

Wednesday, 1 June 2016

Change cartridges HP Deskjet 1000 series

Printer Blog >> Help >> Change cartridges HP Deskjet 1000 series

HP Deskjet 1000 series


Change printer cartridges HP Deskjet 1000, Deskjet 1010, Deskjet 1050, Deskjet 1510, Deskjet 1512, Deskjet 1515.

To change printer cartridges HP Deskjet 1000 series you can follow the instructions in the manual that includes or perform the following steps:


Hp Deskjet 1050

Steps to change the ink cartridges


  • Verify that the printer is connected and that paper. In order to change the printer cartridge correctly must be like if you were to print.
  • Open the cartridge door is at the front. You will see that the car with the cartridges will begin to move to move to the center. Expected to stay standing in the center to remove the cartridges.
  • Press down the cartridge gently until you feel disengages. Sometimes it takes a bit but can usually be easily removed, I remove it from its slot.
  • Open the new cartridge and carefully remove the protective tape. This usually takes a striking and directions on how to remove color. It serves to protect the head cartridge because in these models is integrated. Try not touch the head or contacts, as dirt can cause the cartridge to malfunction.
  • Insert the new cartridge until you hear a click. Make sure you're getting in the right place. If you're trying to get the cartridge and see that you do not fit, try to get him into the next slot because it can not be that your site :-).
  • Close the cartridge door and wait for the printer to perform their "homework".


Once installed a new cartridge, it is best to take out a print test to verify that it works correctly.

More accurate impression you would like shown below:

Print test HP Deskjet 1000


If you have left you with some color spots or it does not work, then you have to perform head cleaning with printer software or manually.

Remember these steps to clean the heads dela HP printer used for the following models:
HP Deskjet 1000, Deskjet 1010, Deskjet 1050, Deskjet 1510, Deskjet 1512, Deskjet 1515.


Tuesday, 24 May 2016

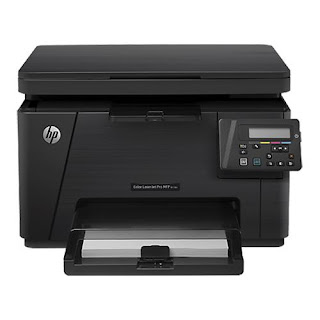
Printer cleaning HP Laserjet Pro M176 MFP

Printer Blog > Help >> Printer cleaning HP Laserjet Pro M176 MFP


Printer cleaning HP Laserjet Pro M176 MFP


Cleaning the HP Laserjet Pro M176 MFP Printer


This HP printer is a semi-professional printer that offers very good performance. If we continue to maintain print quality over time and the printer last us many years, vece have to perform a series of cleanings.

Then you leave the instructions recommended by the manufacturer to keep about your printer as the first day!


HP Laserjet Pro MFP M176


Print page Cleaning


As mentioned in another post, laser printers, with use, they are "smearing" inside the remains of toner powder. We must bear in mind that the toner powder is a very fine powder and can fit through any crack or hole of the printer. Sometimes, you can stay on the rollers and we can cause problems with print quality as spots, dots, stripes, lines, etc.

In order to solve this, we will print with the printer cleaning page.

  • In the control panel of your printer, press "Settings"
  • In the menu that opens, select "Service"
  • Now we choose "Cleaning Mode"
  • Load A4 size plain paper when prompted printer
  • Give the "OK" button and wait for the printer to remove the cleaning page.
  • When finished it will ask you to take back the sheet and reload it into the input tray with the same orientation.
  • Wait until you finish making the process and you can and discard the page.


Other times, it can happen that copies or scans leave us with little dots or fluffs that are unattractive to our impressions. This can deverse to the scanner may have accumulated dust or dirt and is affecting performance. To clean it, follow the steps listed you.


Clean the scanner

Turn off the printer and disconnect it from the power cord to make sure it is turned off at all times.
Open the scanner lid and clean both the glass and the white plastic that is on the top with a cloth or sponge very soft and slightly dampened with glass cleaner. (Do not use abrasives as acetone, ammonia, alcohol and the like).
While dry glass and plastic with a dry lint-free cloth.
Connect the printer again and try to scan or copy something, go! You have your impeccable printer!


These steps are also valid for the HP Laserjet printer Pro MFP M177


Source: 

Tuesday, 10 May 2016

How to change printer cartridges dela DCP-J132W Brother

Printer Blog >> Help >> How to change the printer cartridges of Brother DCP-J132W


Printer Brother DCP-J132W


Change Printer cartridges Brother DCP-J132W


Want to know how to change cartridges Brother DCP-J153W? Us how:
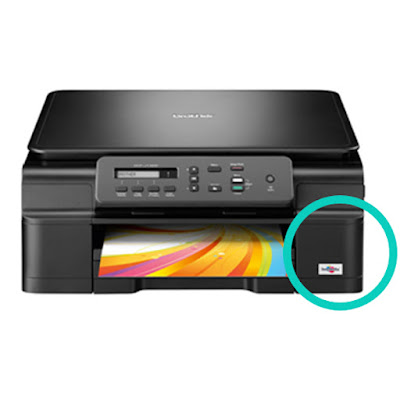
The Brother DCP-J132W printer has four individual ink cartridges. Here we can locate on the right front of the printer:


Brother DCP-J132W

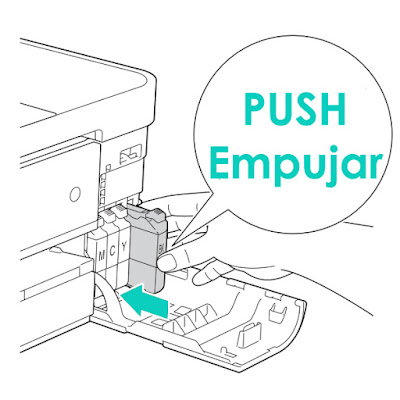
To change we can follow the steps come in the User Guide of the printer or the following:


  • Open the cartridge cover.
  • Each cartridge has a flange at the top. Simply press the lever to release the lock and the cartridge will.Cartridges Brother DCP-J132W
  • Take the new cartridge and remove all the protections you may have. (Without shaking the cartridge).
  • Insert the cartridge in its corresponding color and gently press the cartridge into until you see the lock lever is lifted.
Cartridges Brother DCP-J132W
  • Close the cartridge cover ... and READY!


You have changed your cartridges Brother printer!


To see de original content click to Como cambiar los cartuchos de la impresora Brother DCP-J132W
Printer blog >> Help >> How to change cartridges Epson XP-322 printer


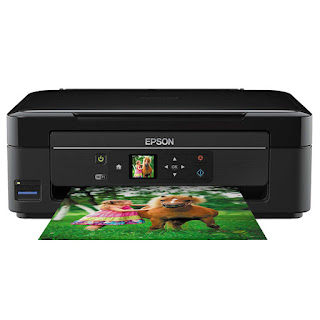
Epson XP-322 printer


Change Printer cartridges Epson XP-322

To replace the ink cartridges from the printer you can use the instructions in the manual for your printer or follow the steps below.


Epson XP-322 printer

* First of all, replacing the ink cartridges so you only when prompted by the printer. The printer must be connected and turned as if ready to print.

  • From the LCD screen verifies that the printer cartridges have to be replaced, press the OK button and select "Change Now" on the menu. Another option is to go to menu "Settings" >> "Maintenance" >> "Ink Cartridge Change" and press the blue button.
  • In the case of black ink cartridge, it is recommended to shake a few times before installing.
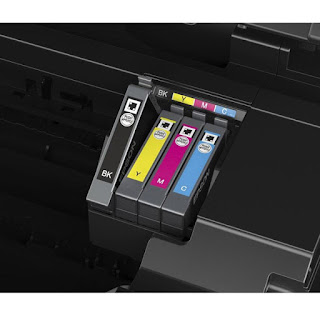
  • Remove the cartridge from the blister and remove solely the yellow tape as shown in the image.
  • Open the top cover to access the cartridges. To remove the cartridge, press the tab and pull it up.

Change cartridges Epson
  • Insert the cartridge into place until you hear a "click" and close the cover up.
  • Press the blue button and ready!


These steps to change the Epson printer cartridges, are also valid for the following models:
Epson XP-102, Epson XP-202, Epson XP-205, Epson XP-212, Epson XP-215, Epson XP-225, Epson XP-30, Epson XP-302, Epson XP-305, Epson XP-312, Epson XP-315, Epson XP-322, Epson XP-325, Epson XP-402, Epson XP-405, Epson XP-412, Epson XP-415.


Change Printer cartridges Canon MG-2555

Home >> Help >> Change Printer cartridges Canon MG-2555

Canon printer MG-2555


Change Printer cartridges Canon MG-2555


All printers usually come with a manual or user guide where are the instructions to change printer cartridges. In the series of Canon MG-2500 you have left at the end of the post the link of all the manuals available so you can download without problems.

Canon MG-2555

You have to change the cartridges when the alarm light blinks orange (error) and the ink lamps at a time.The steps then we will serve you to replace virtually all of Canon's FINE cartridges (two cartridges: one black and one tricolor) type.

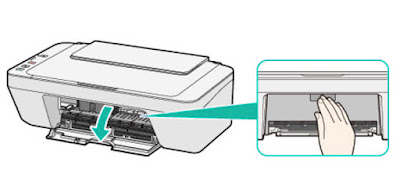
We check that the printer is turned on and connected to the computer.If the paper tray is extended below the close.We open the front cover. To do this we need to pull us and down, as shown in the image below. We'll see how the "car" of the cartridges moves to the center so that we can easily change them.

Cambiar cartuchos impresora Canon MG-2555

  • Remove the cartridge "car." To do this, simply press the end of the cartridge down until it clicks. Do not force or squeeze too, so if you see that it costs a lot of work, maybe you're not doing well.
  • Get the whole cartridge and take the new cartridge. Remember to remove all seals before installing it, because if not, the cartridge will give you problems and will not work perfectly. The seal is usually in the head cartridge.
  • Insert the new cartridge. Make the same movement as when you extracted the other, but in reverse. To lock the cartridge has to make a click.


Cambiar cartuchos impresora Canon MG-2555

Close the front cover. The printer must be ready to print. If the light "alarm" lights orange after installing it ... .you have not done something well: -S. Do not worry and try to do it again.


Check out the original content at Cambiar cartuchos impresora Canon MG-2555

How to change cartridges Canon MX-410 printer

Home >> Help >> How to change cartridges Canon MX-410 printer

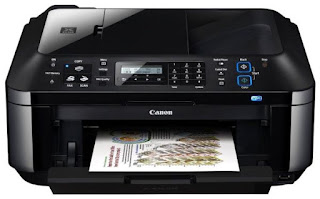
Canon printer MX-410

Change printer cartridges Canon MX-410


Printers usually come with a user guide where you can see the steps to change ink cartridges if you do not have or have lost, you can follow the instructions listed below you.


Canon MX-410


*Change your printer cartridge when prompted only the printer itself. No need to change the two cartridges at a time, only to be depleted.

  • With the printer connected to the computer and the power, check that is on.
  • Open the paper output tray.
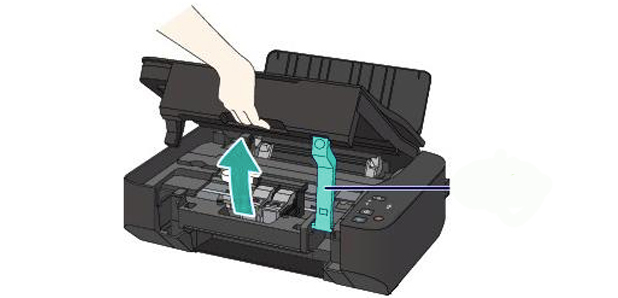
  • Lift the top cover (where the scanner is) to access the cartridges.
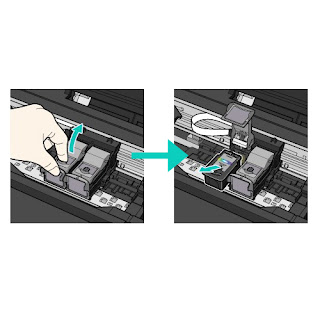
  • Extracts the cartridges as shown in the image. First you have to lift the cover that holds the cartridge and then pull it out.
  • Change printer cartridges Canon MX
  • Take the new cartridge and remove all bearing seals.
  • Install it in the corresponding hole and as such was the other cartridge and close the cartridge cover until it clicks. * It is important that the cover is properly closed and straight to fit.
  • To close the scanner cover you have to lift slightly this and close smoothly.


If you want more information about Canon MX-410 printer can take a look at our review.


These steps to change cartridges Canon MX-410, also serves the following models of Canon printers:

Canon MX-395, Canon MX-475, MX-525 Canon, Canon MX-535, MX-725 Canon Canon Canon MX-895 and MX-925.


Wednesday, 27 April 2016

How to change the Canon MX410 printer cartridges

Home >> Help >> How to change the Canon MX410 printer cartridges

Canon printer MX-410

Change printer cartridges Canon MX-410

Printers usually come with a user guide where you can see the steps to change ink cartridges if you do not have or have lost, you can follow the instructions listed below you.

Canon MX-410
* Change your printer cartridge when prompted only the printer itself. No need to change the two cartridges at a time, only to be depleted.

  • With the printer connected to the computer and the power, check that is on.
  • Open the paper output tray.
  • Lift the top cover (where the scanner is) to access the cartridges.
  • Extracts the cartridges as shown in the image. First you have to lift the cover that holds the cartridge and then pull it out.
Change printer cartridges Canon MX


  • Take the new cartridge and remove all bearing seals.
  • Install it in the corresponding hole and as such was the other cartridge and close the cartridge cover until it clicks. * It is important that the cover is properly closed and straight to fit.
  • To close the scanner cover you have to lift slightly this and close smoothly.

If you want more information about Canon MX-410 printer can take a look at our review.

These steps to change cartridges Canon MX-410, also serves the following models of Canon printers:
Canon MX-395, Canon MX-475, MX-525 Canon, Canon MX-535, MX-725 Canon Canon Canon MX-895 and MX-925.


Look at the original post in Consejos Impresoras

Canon Pixma MP230 Change Cartridges


Home >> Help >> Change Cartridges Canon Pixma MP230


Canon MP-230 Printer


Change printer cartridges Canon Pixma MP-230


Canon MP-230When we have to change cartridges Canon Pixma MP230 our, it is very important not to touch the connectors because it can damage them. Connectors are a metal chapita also known as "chip" if, for example, this chip is dirty or damaged, it can cause the printer not detected properly and the cartridge unusable stay.


The cartridges are changed when the printer throws a warning via computer or if you have, through your screen. This printer uses two ink cartridges, one black and one tricolor. Normally printers require both cartridges are properly installed in order to work well, but only go to print in black and white.


Before you begin, you keep the printer ready to print. Once we have connected the printer is on, follow these steps:


  • Lift the scanner cover as shown in the image.
change cartridges canon MP230
Source: Canon.es


  • Remove the cartridges holding fins cartridges and uploading them.
  • Open the new cartridge by removing all seals (remember not to touch any connector).
  • We insert the new cartridge (each in place) until it engages with a slight click.
change cartridges Canon MP230
Source: Canon.es


  • Put down the printer cover and voila!


These steps also serve you to change cartridges following printers:

Canon Pixma iP2700 Canon Pixma iP2702, Canon Pixma MP230, Canon Pixma MP235, Canon Pixma MP240, Canon Pixma MP250, Canon Pixma MP252, Canon Pixma MP260, Canon Pixma MP270, Canon Pixma MP272, Canon Pixma MP280, Canon Pixma MP282, Canon Pixma MP480, MP490 Canon Pixma Canon Pixma MP492, Pixma MP495 Canon, Canon Pixma MP499, Canon Pixma MX320, Pixma MX330 Canon, Canon Pixma MX340, Pixma MX350 Canon, Canon Pixma MX360, MX410 and Canon Pixma MX420 Canon Pixma.


Look at the original post in Consejos Impresoras

Maintaining Selphy CP910 Canon

Home >> Help >> Maintenance Canon Selphy CP910


Maintaining Selphy CP910 Canon

Basic maintenance tasks

Canon Selphy CP910


The Canon Selphy printers are perfect for printing photos at home quickly and easily as well as being a device that just takes up space. If we want to prolong the life of your printer we must follow some maintenance and take the following precautions:

It would be best to keep the printer in a bag that does not allow transfer materials of this nature.


Maintenance Canon SelphyCare to expose the machines to insecticides and similar products, being tape cartridges ink inked, they can be damaged in contact with any type of spray.


Maintenance Canon SelphyMoving from a hot to a cold environment can create condensation, bringing back the ink ribbon may be impaired. The best thing to do when you have to do some of this is done to let the temperature slowly, and if it happens, let it dry naturally at room temperature before using the printer back to the machine.


Maintenance Canon SelphyIf it gets dirty, clean it with a soft, dry cloth, so as not to hurt, if you do it with very porous or wet surfaces and just then you decide to reuse may your impressions do not get all the good that you thought to what is Canon Selphy usual in the CP910.


Maintenance Canon SelphyIf the vent is dirty, it is important that you first extract the ink cartridge and paper, wipe the machine, spend some time and from there you can reuse the Selphy CP910 printer. If you do not perform well you run the risk of dust or other elements of dirt adhering to the ink film cartridge, or even on the paper surface and then to print appears with a speck in relief to break away will leave a gap in white on the photograph that you just printed.


Look at the original post in Consejos Impresoras

Saturday, 16 April 2016

Printer cleaning HP Laserjet Pro M176 MFP

Home >> Help >> Printer Cleaning MFP HP LaserJet Pro M176


Printer cleaning HP Laserjet Pro M176 MFP


How to clean the HP Laserjet Pro M176 MFP printer


HP Laserjet Pro MFP M176
This HP printer is a semi-professional printer that offers very good performance. If we continue to maintain print quality over time and the printer last us many years, vece have to perform a series of cleanings.

Then you leave the instructions recommended by the manufacturer to keep about your printer as the first day!


Print page Cleaning


As mentioned in another post, laser printers, with use, they are "smearing" inside the remains of toner powder. We must bear in mind that the toner powder is a very fine powder and can fit through any crack or hole of the printer. Sometimes, you can stay on the rollers and we can cause problems with print quality as spots, dots, stripes, lines, etc.

In order to solve this, we will print with the printer cleaning page.

  • In the control panel of your printer, press "Settings"
  • In the menu that opens, select "Service"
  • Now we choose "Cleaning Mode"
  • Load A4 size plain paper when prompted printer
  • Give the "OK" button and wait for the printer to remove the cleaning page.
  • When finished it will ask you to take back the sheet and reload it into the input tray with the same orientation.
  • Wait until you finish making the process and you can and discard the page.


Other times, it can happen that copies or scans leave us with little dots or fluffs that are unattractive to our impressions. This can deverse to the scanner may have accumulated dust or dirt and is affecting performance. To clean it, follow the steps listed you.


Clean the scanner

  • Turn off the printer and disconnect it from the power cord to make sure it is turned off at all times.
  • Open the scanner lid and clean both the glass and the white plastic that is on the top with a cloth or sponge very soft and slightly dampened with glass cleaner. (Do not use abrasives as acetone, ammonia, alcohol and the like).
  • While dry glass and plastic with a dry lint-free cloth.
  • Connect the printer again and try to scan or copy something, go! You have your impeccable printer!


These steps are also valid for the HP Laserjet printer Pro MFP M177


Look at the original post in Consejos Impresoras

Tips and tricks on drums printer

Home >> Help >> Tips and Tricks on drums printer


Tips drum printer


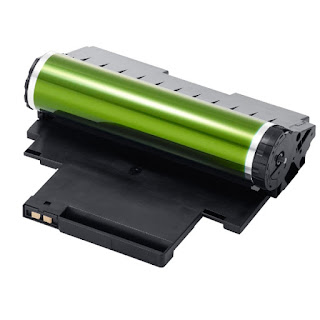
Laser printer drum


Laser printer drum

Here we present some questions that we normally do those who have a printer drum.

As we explained in a previous post, the drum is known by several names: drum imaging unit, drum ... It is a very delicate piece of laser printers is perishing with use.

The drum is responsible for transferring the toner powder to the paper, so sometimes when the drum is dirty, defective or is running out, can get out dirty or dark background prints.

Let's answer some questions we can get to do when we have a laser printer.


If I clean the drum I can avoid change?


The drum has a certain life since the use is perishing. As much as you clean it with a cloth ... if the drum is exhausted, there is nothing to do :-(

Is it better to independent drum or integrated with the toner?


It is a question that many people do and ... there is no clear answer. It all depends on the use you are going to give to the printer.
If you go to print a few copies a year, it is best to buy a printer with separate drum, and the drum will wear less and will last much more than the toner, so that the parts will come out cheaper.
But if you'll give much cane to the printer, ie going to print daily a fairly high volume, it is better than the drum will already integrated with the toner, since it is you wear before and eventually, out cheaper toner drum integrated buy a toner + drum.


Can you give light to the drum?


We recommend that the less time the drum is exposed to the best light, to prevent can give us problems.


Look at the original post in Consejos Impresoras